Saturday, April 14, 2012

Pizza Muffins


While surfing pinterest today, I discovered a recipe where you use bisquick, chicken and veggies, to make your own mini chicken pot pies. (Just and FYI, it is REALLY hard to think of this as chicken pot pie, as here, where I live, chicken pot pie is known as chicken, veggies, and homemade noodles, in a thick gravy type soup, cooked in a pot. Hence, chicken POT pie. I have no idea why you wouldn't just call it chicken pie; but I digress.) I found this to be an extremely awesome idea, and decided right away, I was doing it. The website Betty Crocker, tells you a bunch of other things you can do, too, using the bisquick, and a  muffin pan. One of them is using sauce and cheese to make pizza ones. Well, wouldn't you know, homemade pizza is what I had on the menu for tonight. I just couldn't wait to try it.

But wait... I don't have bisquick. I knew that. Doh! I did think that I had some baking mix, though, that I thought I would use instead. Wroooongo. Oops. I guess it's time to get to the grocery store. Boo. I was really looking forward to trying this...................................................................................................... *Ding!* <--- that was the sound of the light-bulb going off inside my head. (Yeah, it took a little while.)

Now, I know I'm not alone in this; You go grocery shopping, and while in the refrigerated cookie dough isle (hush) you decide you want to buy some biscuits, crescent rolls, pie crusts, because you have ever intention of making these to go along with meals. You get home and make up some crescent rolls to eat with dinner, that night. Then, you throw the rest of them in one of your refrigerator drawers, never to be heard from again. Well... maybe I am alone in this. Please tell me I'm not?

I've side tracked. Let me get back to my point... I had some buttermilk biscuits in the fridge that were in desperate need to be used. I was so happy I remembered them, because I HATE to waste anything. *Penny pincher, here.* Guess what. It worked. We got to eat some yummy pizza, it was the easiest pizza I ever made, it bakes up super fast, and I didn't waste any food. That's always a score in my book.

What you'll need:
  • Ready to make buttermilk biscuits
  • Pizza sauce
  • Cheese
  • Pam
  • Any toppings you'd like
  • Any seasonings you'd like

Set your oven to whatever temperature your biscuits tell you to. Mine was 400. Spray muffin tin with your Pam. (Or if you're like me, the generic version of.) Take each biscuit and flatten it like it's a little mini pizza crust and then fit into each muffin tin.
Add your pizza sauce. A 1/2 tablespoon sauce worked perfect for me.
Add your toppings. I chose to use mozzarella and cheddar. I also had a few pepperonis left over from the last time I made pizza, so I used them up, too. I then sprinkled the top with a little Italian seasoning.
Bake, following the directions for your biscuits. I baked mine for 12 minutes.
Now, at this point, I should probably tell you to let them cool for a few minutes, and then pop them out and eat them... but I'm not gonna do that. Because I don't do that. I popped these suckers out right away, sprinkled a little Parmesan cheese on them, and ate them. Mmm mmm mmm.
As an extra special treat, if you happen to be calorie counting like me, I even figured out the calories per "pizza muffin" for you. (Of course these calories are based on what I made them with.) Yoooooooooou're welcome.

The brand biscuit I used was Aldi's brand, buttermilk biscuit. I used part skim mozzarella cheese, cheddar cheese, and weis brand pizza sauce. I don't remember the brand of pepperoni, and I'm too lazy to get up and dig the baggie out of the garbage.

Amounts: 1 biscuit, 1/2 tablespoon sauce, 1 tablespoon each, mozzarella and cheddar (This is pushing it. I didn't even use a tablespoon of each) = 100 calories. With pepperoni slice =110. I did not count the Parmesan cheese, because the #'s for the other cheese was over compensated.

Enjoy! (P.S. You're kids will LOVE them.)


Friday, March 16, 2012

Peanut Butter Caramel Corn Chips

I am very very sorry. I really was hoping to keep up with this blog better, but I just don't have much time. Between all the appointments I've had lately, 2 very small children, and life in general, it's very hard to sit down long enough to type something out. Today though, Griffin is sleeping, Evan is watching cartoons, and I'm forced to relax a bit, because of this poopy hernia; so a blogging I will go.

This recipe came to me from my super awesome Grandma Keister. She used to make this a lot when I was little, and I love love love how it tastes, so about 10 years or so ago, I asked her for the recipe. I couldn't get over how ridiculously easy it is to make. Since then, I make it a few times a year, and it never lasts long in this house. Admittedly, mostly from me... cause I just CAN'T keep my hands off of it. The combination of sweet and salty, and of course caramel being my all time favorite treat; it's mmmm. Soooo mmmm.

Peanut butter Caramel Corn Chips:
aka Kookie Cookie (This is what my Grandmother calls it, so this is what it will forever be known as in my home.)

1 cup peanut butter
1 cup light corn syrup
1 cup sugar
1 bag regular corn chips.

 In a pot, on medium heat, mix together the peanut butter, corn syrup and sugar. I seem to have not taken all the pictures I needed, so here's a picture with them all just plopped in the pot, lol.

Stir this until completely melted and sugar is dissolved. This takes a little patience, but it is so worth it!

In a 9x13 pan, spread the corn chips out evenly. No need to grease the pan.

After the peanut butter mixture is done, pour it evenly on top the corn chips. That's it! You're done.

You need to let this sit for at least a couple of hours to let the caramel firm up. I usually let it sit overnight, but trust me, it's really really hard. When it's firm, just cut it into squares and enjoy. I also didn't take a picture of that, because by the time I remembered, it was mostly gone. Whoops. ;)

FYI: I am aware that this doesn't look like the most appetizing thing out there. In fact, I've been told that several times. They changed their tune, though, after they tasted it. If I weren't currently on a diet, I would be making myself some. Try it. You'll like it!

Thursday, February 23, 2012

Ashley's "famous" meatloaf

Let me start off by saying that my meatloaf isn't exactly "famous". Well ok, it's famous in my family, but that's about as far as it goes. The only reason I'm calling it that, is because that's what my brother called it the other day. Why? Cause it's friggin yummy.

Most of the time, you don't beg for meatloaf. It's really more of a "I'm running low on food, so let's make a meatloaf." But in my home, it's not thought of that way. Every time I tell my husband I'm making meatloaf, he practically jumps for joy. Funny too, because the first time I made him meatloaf, he refused to eat any, because he didn't think he would like it. Brat. Now though, he asks for it quite frequently. Especially if I hadn't made it in awhile. Besides him, the rest of my family loves it too. (Including brothers, mothers, nieces and nephews.) I've served it to a few friends, also, and I can honestly say I have never had anyone not think it was awesome. (Unless they lied.) ;)

It's ridiculously easy, with only a few ingredients, but it's mouthwatering none the less. The only problem with telling you how I make the meatloaf, is that I don't really measure. So, if you make it, you're gonna have to wing it right along with me.

What you'll need:
2lbs ground beef/turkey/venison (I like to do 1/2 one meat, 1/2 the other)
1/2 cup ketchup
2 large eggs
Italian bread crumbs
garlic powder
onion powder
4 slices of American cheese

Topping:
Ketchup
Mustard
Brown sugar

Pre-heat the oven to 375. (I want to point out here, that it really varies from oven to oven. In my old oven I used 350, in this new oven I need 375. I also went from baking it for an hour to an hour and 15 minutes. So you'll just have to see what works best for you.)

Put your meat, ketchup, seasonings and eggs in a bowl together. (Just an FYI, these pictures are showing this recipe doubled. I need to make extras for lunches so I double the recipe.)
Start mixing. You gotta do this with your hands. Stop being a baby. Dig in! ;) Add the bread crumbs in small batches. You don't want to add too much bread crumbs, so it's best to do a little at a time. BUT, you don't want to do too little at a time, because you don't want to over mix. When you over mix, you break the meat down too much, and it gets too loose. I do not measure, but I can tell you, for this 4 pounds of meat, I used about 16oz of bread crumbs. So for 1/2 this size, you would probably use 6-8oz. You want the meat to still be a bit "wet" but not sticky. Too much bread crumbs, and your meatloaf will be dry. This might sound difficult to figure out, but it's really not. You will see in the following pictures, that it is balled up nicely.

After you have the meat mixed up, wash your hands and make the sauce. For that, all you'll do is put some ketchup, mustard and brown sugar in a bowl. Ketchup and mustard in about a 8:1 ratio, and then just add some brown sugar and mix. You want it to taste kind of like barbecue sauce, but more on the "ketchupy" side. You really can't screw this up though. Just make it however you think you'll like it.
After the sauce is made up, press 1/2 of the meat mixture into your pan. My picture is showing my meatloaf in an 8x8 pan. That is because it is so large. When I made my 2lb meatloaf, I used a loaf pan.

After adding the meat, lay your cheese out over top the meat.

Spread some of the sauce over the cheese.
Press the rest of the meat in the pan, and spread the rest of the sauce over top. (I forgot to take a picture, so here's one of it in the oven.)
Bake for 1 hour and 15 minutes.
I like to let it cool for a few minutes before cutting. This meatloaf is heavy, and a small slice goes a long way. Also, I use two spatulas to get a piece out. One on each side and pull it out.
There you have it. It's really easy, but ridiculously good. I COMMAND you to try it. Ok, well if that didn't work... what if I say, please?

Wednesday, February 22, 2012

Mozzarella Sticks

Who does not like mozzarella sticks? I mean, seriously? Oozy cheesy goodness, inside a crunchy little shell. I think my stomach just flipped. Now, my next question is, who likes to pay the price for mozzarella sticks? C'mon, why in the world are they so expensive? Most restaurants charge anywhere from $5-$7 for 4-6 small mozzarella sticks. I mean, they're good, but they're not THAT good.

Well, good news. You don't have to spend a ton of money. Make them yourself!! They are ridiculously easy to make. Try it!

What you'll need:
Pack of string cheese
1 Egg
Splash of milk
Bread crumbs (I prefer Italian)
Oil for frying
Marinara sauce for dipping.

What you need to do:

Heat oil to 350.
Beat and egg an with a splash of milk added to it.
Pour some bread crumbs in a bowl or on a plate.

I like to cut the cheese sticks in half and make mini sticks, but you can use the stick just like it is, too.
Dip the cheese stick in the egg wash, coat in bread crumbs, stick back in egg wash, and coat in bread crumbs again. (If you find you are running out of egg wash, just get another egg and another splash of milk.) Fry cheese sticks for about a minute, or until golden brown. Place on a plate lined in paper towel to drain. Dip in marinara sauce, and enjoy.


See, I told you it was easy. And you end up with 12 large mozzarella sticks (or 24 small if you cut in half) for less than you would have paid in the restaurant for 6 small ones.

Tuesday, February 21, 2012

Cheesecake cups

First of all, I want to apologize for not updating my blog for awhile. I know, there are a few people who actually follow my blog, and I want you to know that I haven't forgotten about you. Most of you already know, through my Facebook, that we have been going through some stuff lately, and that has taken up much of my time. But, I've had a post waiting for almost 2 weeks, that hopefully if my children give me a spare minute, I can type up quickly, lol.

As most of you know, I've been trying to find new things to make, and this was one that I just couldn't pass up. I found the recipe here. Cheesecake cupcakes

Basically what it is, is individual cheesecakes. They are so yummy. Now, the recipe originally called for raspberries, but do you have any idea how hard it is to find raspberries during winter in PA? Apparently it's impossible. So, I chose blueberries instead. It was wonderful. Next time though, I think I will choose to get a raspberry or strawberry preserve and skip the step of pureeing my own fruit.

When I made this recipe, I only made half the recipe, because I didn't want to waste cream cheese, in case I didn't like it. Well, I was wrong. I should have just made the whole batch, because these did not last in my house for very long. So if you like cheesecake, just do yourself a favor, and make the whole thing.

I also think that the butter isn't quite enough, so I melted a little bit extra and added to the graham cracker crumbs. Before adding the butter, I couldn't get the crust to press down right, and it crumbled too much. So start with what is recommended, but add a little more if you find yours is crumbling, too.

One more thing: If you're like me, and have never made cheesecake before, the toothpick test does not work. Just trust the time stated for baking. They turned out perfect. :)

If you try these, let me know what you think of them. I always love to hear about things you've made. Now, here are the before baking and after baking pictures.


Sunday, February 5, 2012

Homemade Laundry Detergent

I'm sure, by now, you've heard that LOTS of people are making their own laundry detergent. With the way prices are increasing every day, people are trying everything they can think of to save themselves some money.

I made my own laundry detergent YEARS ago, but got away from it when my life got in the way. I started making it again a little over a year ago, and I can tell you I am never going back. It is easy to make and ridiculously cheap. There are tons of different recipes out there, and honestly, there really isn't a "wrong" way to do it. Everyone likes their detergent differently, and over time you will learn which way you prefer it.

I'm going to "show" you how to make liquid detergent, and tell you how to make the powder. I use both. If I'm honest, I prefer the powder, but the liquid is cheaper. They both work just as well, though.

You will need the following things to make your detergent:
Fels Naptha bar soap
Borax
Super WASHING soda (NOT baking soda)
OxyClean (or generic version of)
A grater or food processor
5 gallon bucket (if making the liquid)
Water (if making the liquid)

Liquid:
First thing you want to do is grate of the Fels Naptha. For MY liquid detergent I use 2 bars. (Many recipes call for only 1 bar of soap and 1 cup of everything else. But this makes it too much of a liquid for me. I like there to be a thickness to it, so I double it. This is just my personal preference. To save money, half all of my ingredients, except water. It will still clean your clothes well.) Put into a pot and fill it up to just above the soap. Put it on medium heat, and stir until melted. This does take a little bit of patience.


In the 5 gallon bucket, add your dry ingredients. 2 cups borax, 2 cups super washing soda and 2 cups of OxyClean. (The OxyClean isn't needed. I add it, because I like the thought of the extra "boost" but skip it if you want to.) Add the soap to it, and fill the bucket HALF WAY full with HOT water.


Mix until dissolved. (I like to use the handle to the swiffer duster thing. It's plenty long enough and I think it stirs it really well, with the "forked" end.) Fill the bucket the rest of the way with water. Let sit for 24 hours.

VERY IMORTANT: Don't actually fill the bucket ALL THE WAY to the top. It needs some room to expand. Also, DON'T put the lid on tight until the liquid is cooled.

Oops.... ;)

After it has sat for 24 hours. Stir again. I then use a measuring cup with a pouring lip to fill up empty laundry detergent containers. Note, the picture below looks extra lumpy, but that's just because it was the very top of the bucket. When mixed it doesn't look like that.


Don't fill these all the way to the top either. If you're like me, and use double ingredients, it will be a little lumpy. It's really no big deal, but I like to shake the detergent bottle, before pouring it out, to break up some of the lumps.

I use the lid to the laundry detergent container to measure it out. And, before anyone asks, YES, this will work great in your HE washer. It is not a sudsing detergent, so you don't have to worry about that.

Powder:

To make the powder detergent, It's the exact same ingredients, you just mix it all together, and don't add any water. So 2 bars soap, finely grated; 2 cups borax; 2 cups super washing soda; 2 cups Oxy. Use 1 tablespoon per load for HE machines and 2 tablespoons per load for regular washing machines.

I do want to also add that other types of soap can be used. Ivory is a good substitute. I have not tried it in the liquid detergent, but I do half Ivory and half Fels Naptha in my powder detergent. (Cause I got if for free couponing.) The rule is this, it CANNOT be a "beauty bar" type detergent. So, nothing like Dove or Caress. But if it were up to me, I'd just stick with the Fels Naptha. Google it. It's some GREAT stuff. :)

Cost: This whole 5 gallon bucket full of detergent cost me less than $5 to make. Score.


Thursday, February 2, 2012

Shirley Temple Cupcakes

I love sweets. At least, lately I have. I'm normally a salty type of girl, but for the last few months, I crave sweets every day. Not a good thing for my waistline... but lucky for me, my waist is already ruined, soooo, like I said; lucky me. ;)

If your head isn't under a rock, you've probably heard of pinterest. If you haven't, you are missing out. Ask me for an invite and I will gladly send you one. Beware, the site is addicting, and you are likely to spend lots and lots of time there.

While browsing one day, I found a recipe for Shirley Temple cupcakes. I love Shirley Temples. I am not much of a drinker, but there is nothing worse than going to a Christmas party where it's an open bar, and being pregnant, so you can't drink anything. Ok, I'm sure there are many worse things; in fact, I know there are, but at the time it sure didn't feel that way. That was what happened to me in 2009 AND 2010, as I was pregnant both times. (Wouldn't change that for the world, though, of course.)

While sitting at the bar, watching everyone else sip on their tasty drinks, I felt left out. I am perfectly happy with virgin drinks, don't get me wrong; but when you CAN'T have something, that makes you want it all the more. So I asked the bartender if she had a simple virgin drink she could make me. That's when she told me about the Shirley Temple drink. Can you believe I've never heard of it? Honestly, I hadn't. So I tried one. Not anything really special. 7-up or Sprite or whatever, and splash of grenadine, with a cherry on top. Of course, there are other versions, but this is the one she served me. It worked. I had a "fancy" looking drink to sip on, and that made me happy.

So, when I came across these cupcakes I had to try it. I've heard of a soda cake before but had never tried it. This recipe called for a diet 7-up. I didn't have diet 7-up and only had regular Sprite, so I used that instead. From what I hear, you also aren't supposed to use cold soda either, but I did. And it turned out just fine. In fact, the cake was soooo moist! Loved it.

I am not going to post the recipe, but link it at the bottom instead. These cupcakes would be AWESOME to make for your sweetheart for Valentine's Day. Even better, if you use the marble trick, and turn your cupcakes into heart shaped cupcakes. I'll post that link at the bottom too. 

I really hope you make these cupcakes. They were delicious. They only think I can tell you that I did differently is I added 2 tablespoons of cherry juice to the topping instead of 1. Next time, I'll add even more, so there is more flavor, and the topping ends up pinker.  I also used regular cream cheese, instead of lite.
Find the recipe here: Shirley Temple Cupcakes
Find out how to make heart shaped cupcakes here: Heart cupcake

Wednesday, February 1, 2012

Chicken corn soup with dumplings

I want to start out by saying, I've sorry it's took so long to put up this post. Weekends are always busy for me, and I've had Dr. appointments the last two days. Now that I have a free second, I'm going to try to get this all written out.

So, we started out learning how to cook a chicken in a crock pot; then we learned how to make chicken stock in a crock pot, and lastly I am going to show you how I make chicken corn soup in a crock pot, using the chicken that we made and the stock that we made.

First you want to gather all of your ingredients. You're gonna need:

Chicken (I used most of the chicken that I had made the other day, but not all of it. If you like lots of chicken, throw it all it!)
2 - 16oz bags of frozen corn
1 - 16oz bag of frozen carrots (or more if you want to; I like the sliced frozen carrots)
chicken stock (I don't really measure, but I use probably 6 cups)
water (I usually use about the same amount of water as I do chicken stock. Maybe a little less)
seasonings (I use garlic and onion powder, creole seasoning, salt and pepper)

Anyone who is used to cooking in a crock pot, knows that there aren't really any rules. The above ingredients are really, just a guideline. You can do whatever you want to it. Add celery, or whatever veggies you want. Make as much or as little as you want. This is just how I like to do it.

Throw the chicken, and veggies in the crock pot and then add your chicken stock and water. Don't fill it all the way to the top, cause you're gonna need the room for your dumplings. I don't add the seasonings now, because I like to taste it, and tasting cold, unseasoned chicken stock is pretty gross! If you are cooking this for a dinner, turn it on low; for lunch, put it on high. Cook it until it's nice and hot. High 3-4 hours; Low 6-8 hours. Add the seasonings an hour two into cooking.

About 45 minutes before you want to serve it, make up the dumpling mix. For that, you'll need

1 1/2 cups flour
1/2 teaspoon baking soda
1/2 teaspoon salt
chives (I use the freeze dried ones, and just dump in whatever I want)
6 tablespoons of butter, melted
1/2 cup milk

(FYI, for a full pot, I like to double the dumplings recipe. My whole family dies over them, so I make a bunch so everyone gets.)

Mix dry ingredients in a bowl. Add butter and milk and mix. Drop by tablespoons in the HOT soup. Stir it around a bit. Put lid back on and cook for another half hour. These dumplings are very light and airy, and oh so good.

In hindsight, I should have taken more pictures, I suppose. But I was cooking this for a Sunday after church lunch, so was rushing around cleaning my home while this was cooking, and didn't really have the time to be taking pictures. But, here's a picture after half of it had already been eaten.

My family LOVES this soup. In fact, while eating it, I hear lots of "Mmm's" "This is so good's" and even the occasional "Ashley, you could open a restaurant." I'll admit, this makes me beam from ear to ear, and even brings a tear to my eye. It feels good to be appreciated. It's even better when you love cooking for your family.

This crock of soup fed 4 adults (with 2 FULL bowls, each), 5 children, and 2 BIG servings of leftovers for packed lunches the next day. The BEST part? This whole meal cost me about $9. Cha-ching.

Sunday, January 29, 2012

Homemade Chicken Stock

If you read my last post, I showed you how to cook a chicken in the crock pot. Now I'm going to show you how to make homemade chicken stock from that chicken.

First thing's first. What are you going to do with the chicken? Either way, it's already falling off the bone, so you gotta get all that good meat off the bone. I like to de-bone my chicken into another container. Then, you throw all the bones and skin back into the crock pot. I like to keep some of the onion with the chicken if I'm using it for something other than eating it immediately. (Which I did.)


After you have all the bones and skin back in the crock pot, you need to cover them with water + 1-2" above the skin and bone. Turn your crock pot on low, and go to bed. Let it cook at least 12 hours, but you can let it cook up to 24 hours if you want to.


 After it has been cooking for the time you want, you need to turn it off and let it cool. Once it's cool to the point you can handle it, it's time to strain it. What I use is a mesh colander, a big picture, and a small measuring cup. I scoop it with the small measuring cup and dump it through the colander, into the pitcher. (I like to use the pitcher, because it helps with pouring it, later on. But you can use whatever you want.)


 But, don't throw those bones away!!! No, no, no! Put them in a freezer bag and throw them in the freezer. When you save up some more bones, you can throw them back into the crock pot, and make more stock from them. They are good until they virtually disappear!


 Once you got the stock all poured into your container, put it in the fridge overnight. This will bring all the fat up to the top.

 Skim the fat off the top, and then pour into your containers for freezer. I prefer the ziploc containers with the screw on lids, but you can even use ziploc bags if you really wanted to. (I don't recommend it though, because it seems like every bag I did this way, ended up busting when I thawed it.) I like to store it in 1 or 2 cup portions.

Stay tuned for my next post where I show you one of the ways I use my chicken stock. :)


Friday, January 27, 2012

How to cook a chicken; the crock pot way

In this post I am going to tell you how to cook a whole chicken in the crock pot. It is REALLY easy. In fact, almost too easy for a blog post. But learning to cook a chicken in the crock pot leads up to my next two posts. If you don't own a crock pot, you are missing out! A crock pot is an AWESOME way to cook a meal without hardly any work. I own 3 crock pots, and I will probably eventually own more. They are not expensive, so don't let that be your excuse. You don't need one will all the bells and whistles. One with a simple dial of off, low, high and warm will suit you just fine. I paid $5 for one purchased at Lowe's, that included a small dip crock pot too.. There are deals, so keep your eyes out for them.

Purchasing and cooking a whole chicken is a great way to save yourself money. Whole chickens are generally around 99 cents a pound. One chicken easily feeds my family a dinner and lots of leftovers. On top of the savings, it's just yummy and makes your kitchen smell sooo good.

If you purchased a chicken and put it in your freezer, you should pull it out and stick it in your fridge 2 days before you wanna cook it, so it thaws. You can cook a frozen chicken, but it will take longer to cook. If you purchased a chicken and stuck it right in the fridge, there is no prep work.

There really are no rules to making a chicken. You can do pretty much whatever you want to it. The way I make mine, is I stick the chicken in the crock pot and add a cup of water. Then I slice an onion, put it on top and around. A couple tablespoons of garlic, and some creole seasoning. (I LOVE creole seasoning.)


Let it cook on low for 6-8 hours, or on high for 3-4. If it's partially frozen or completely frozen, I recommend that you do it on high for 4 hours, and then you can probably turn it on to low and cook it for another 2-3. 

That's all there is to it. When it's done, you end up with super yummy chicken. You can either eat it this way, or use it for something else. That's what I'm planning on doing. Stay tuned for those!


Wednesday, January 25, 2012

Money Saving Tip #2

Ok, so I wanted to try to post things I made more often, but the last couple of days have been pretty busy for me, and I have a sore throat... I don't think I'm ever picking up another kid besides mine in the church nursery again, lol. So, I decided I'd post another "tip." This is one of the ways that I save myself some money.

It's pretty simple. Some people know they can do this, but you would be surprised how many people don't.

Instead of purchasing individual packages of pork chops, buy a big unseasoned pork loin. Doing this will save you normally, anywhere from 50-75 cents per pound. Every penny counts! I LOVE doing it this way, because not only do I save my family money, but I can choose how thick and thin I want the chops. And I don't have to worry about bones, either. Pork loins at the grocery store I purchase from are generally 11-12 lb loins. I cut them into 32 chops, and then put them into four labeled freezer storage bags. 

Evan loves pork chops. It's one of the few things I don't really have to coax him to eat. I did make a great meal tonight, and he gobbled it up. I didn't take any pictures, because honestly, I was being lazy. And I have a sore throat. For some reason, that pretty much renders me from doing anything. Me, and more poor poor throat. Who wants to throw me a pity party? If you do, make the cupcakes from my last post. ;)

I'm gonna post the "recipe" for the chops I made. They were good and really easy. It was basically a cheaped up version of apple onion pork chops. I didn't have apples, because I never buy them since I can't eat them, but I always have apple juice on hand. So I used that! Recipe below: (This is for MY family portion. If you are not cooking for leftovers, you could half it if you want to.)

Onion Apple Juice Chops:

8 pork chops, 1/2" thick
2 medium onions, chopped
1 cup apple juice
1 tablespoon brown sugar
garlic and onion powder
Salt and pepper
Oil for frying

Pre-heat oven to 400 degrees. Heat oil in frying pan on medium heat. Salt and pepper both sides of chops. Brown chops on both sides and transfer to a baking dish. Using same oil, sautee onions until tender. Add apple juice, brown sugar, and garlic and onion powder (to your liking.) Bring to boiling, turn heat down and simmer for 5 minutes or so, to cook down the liquid a little. Pour mixture over chop. Bake for 30-40 minutes, or until chops are no longer pink in the middle and juices run clear. (Or use a thermometer. They should reach 160 degree.)

If you try it, let me know. I would love to know if you liked it.


Monday, January 23, 2012

Zebra cupcakes

Ok, before I start this post, I should tell you, I am not a baker. I don't mean that I don't like to bake, just that I'm not very good at it. I'm great at eating it, though. I'm pretty much a MASTER of that. ;) Now that you know that... on with my post.

I've seen through the years, people posting about zebra cakes. It's basically where you mix a chocolate cake and a white cake together, and bake it, and when you open it up, it looks like zebra stripes. Awesome. Who doesn't like to get a little wild? I reallllly have been wanting to try it, but I didn't know where to start. I had read some articles awhile ago (sorry, don't remember the links), and last night, I decided, what the heck; let's try it. 
Now, I didn't have anything I needed. I didn't have a white cake mix or a chocolate cake mix, and I really wasn't in the mood to bake a cake from scratch. (Though, they are always better that way.) I did though, have a yellow cake mix from Pillsbury, and... food coloring. The cake mix I have really isn't the best to use for the technique I tried. Why? Because it has pudding added to it. Sure, it makes cake more moist, but it also makes the batter thicker. It worked, though. So if you want to try this, don't be discouraged if that's all you've got. If you want to try this, but have to go shopping first, choose a mix that doesn't have the pudding in it, simple. 

Also, this technique is really best used in a whole cake, rather than cupcakes... but I didn't feel like flouring a pan, digging out my cake holder, and decorating a cake, so I chose the easy route of cupcakes... with liners. It still worked, it's just not as pronounced as it could have been.

First, start out by gathering all the ingredients you need, according to the cake package. If you want to make the batter from scratch, just google it. I'm sure you'll find a recipe that will work great for you.
If you're only using one mix, divide the mix in half. If you're using a chocolate and a white, you'll already have them separated. 

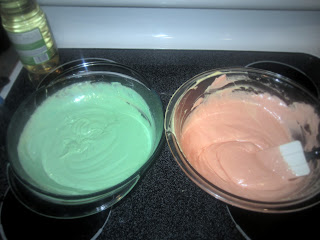
Since I'm only using one mix, I need to add food coloring to each one. The colors I have are red, blue, green and yellow. Since the cake mix is yellow, the only ones that would really work are red and blue, to make the mix green and orange. Green would just make a yucky brown, and yellow would probably just make a brighter yellow.


 Mix, mix, mix... As my son would say "ooooo pretty."

 Once you have your colors made up, you layer the colors. Since I did cupcakes, I used a tablespoon, and did green, orange, green, orange. Get it? If I were making a cake, I would probably use a 1/4 cup instead. (My gears are moving (which is rare), and I think this would look really awesome in a cake with 4 colors.) Fill cupcake liners to about 2/3 full. Bake like the box (or your recipe) tells you to.


While the cupcakes baked, I made up a chocolate buttercream frosting. It was really good, but I wish it were a little thicker. Maybe if I try again, I will add a little more cocoa and sugar to it, or leave out a little of the milk. I found that recipe here.

 After the cupcakes cooled, I frosted them. I don't have a piping bag, so I used a gallon ziploc bag that I filled with the frosting and cut the tip off of. I'll admit, it was the first time I'd ever done it that way, and I have carpal tunnel, so... have I mentioned, I am not a baker?


I was so excited to see how these turned out, I could hardly wait. Neither could my toddler. So I sliced one open...

 I am really happy with the way they turned out. Especially for my first try. I'm really excited now to try this in a cake. 

I hope you enjoyed this post, and if you decide to try it, I hope you'll make my day and share your pictures with me!!