Sunday, January 29, 2012

Homemade Chicken Stock

If you read my last post, I showed you how to cook a chicken in the crock pot. Now I'm going to show you how to make homemade chicken stock from that chicken.

First thing's first. What are you going to do with the chicken? Either way, it's already falling off the bone, so you gotta get all that good meat off the bone. I like to de-bone my chicken into another container. Then, you throw all the bones and skin back into the crock pot. I like to keep some of the onion with the chicken if I'm using it for something other than eating it immediately. (Which I did.)


After you have all the bones and skin back in the crock pot, you need to cover them with water + 1-2" above the skin and bone. Turn your crock pot on low, and go to bed. Let it cook at least 12 hours, but you can let it cook up to 24 hours if you want to.


 After it has been cooking for the time you want, you need to turn it off and let it cool. Once it's cool to the point you can handle it, it's time to strain it. What I use is a mesh colander, a big picture, and a small measuring cup. I scoop it with the small measuring cup and dump it through the colander, into the pitcher. (I like to use the pitcher, because it helps with pouring it, later on. But you can use whatever you want.)


 But, don't throw those bones away!!! No, no, no! Put them in a freezer bag and throw them in the freezer. When you save up some more bones, you can throw them back into the crock pot, and make more stock from them. They are good until they virtually disappear!


 Once you got the stock all poured into your container, put it in the fridge overnight. This will bring all the fat up to the top.

 Skim the fat off the top, and then pour into your containers for freezer. I prefer the ziploc containers with the screw on lids, but you can even use ziploc bags if you really wanted to. (I don't recommend it though, because it seems like every bag I did this way, ended up busting when I thawed it.) I like to store it in 1 or 2 cup portions.

Stay tuned for my next post where I show you one of the ways I use my chicken stock. :)


Friday, January 27, 2012

How to cook a chicken; the crock pot way

In this post I am going to tell you how to cook a whole chicken in the crock pot. It is REALLY easy. In fact, almost too easy for a blog post. But learning to cook a chicken in the crock pot leads up to my next two posts. If you don't own a crock pot, you are missing out! A crock pot is an AWESOME way to cook a meal without hardly any work. I own 3 crock pots, and I will probably eventually own more. They are not expensive, so don't let that be your excuse. You don't need one will all the bells and whistles. One with a simple dial of off, low, high and warm will suit you just fine. I paid $5 for one purchased at Lowe's, that included a small dip crock pot too.. There are deals, so keep your eyes out for them.

Purchasing and cooking a whole chicken is a great way to save yourself money. Whole chickens are generally around 99 cents a pound. One chicken easily feeds my family a dinner and lots of leftovers. On top of the savings, it's just yummy and makes your kitchen smell sooo good.

If you purchased a chicken and put it in your freezer, you should pull it out and stick it in your fridge 2 days before you wanna cook it, so it thaws. You can cook a frozen chicken, but it will take longer to cook. If you purchased a chicken and stuck it right in the fridge, there is no prep work.

There really are no rules to making a chicken. You can do pretty much whatever you want to it. The way I make mine, is I stick the chicken in the crock pot and add a cup of water. Then I slice an onion, put it on top and around. A couple tablespoons of garlic, and some creole seasoning. (I LOVE creole seasoning.)


Let it cook on low for 6-8 hours, or on high for 3-4. If it's partially frozen or completely frozen, I recommend that you do it on high for 4 hours, and then you can probably turn it on to low and cook it for another 2-3. 

That's all there is to it. When it's done, you end up with super yummy chicken. You can either eat it this way, or use it for something else. That's what I'm planning on doing. Stay tuned for those!


Wednesday, January 25, 2012

Money Saving Tip #2

Ok, so I wanted to try to post things I made more often, but the last couple of days have been pretty busy for me, and I have a sore throat... I don't think I'm ever picking up another kid besides mine in the church nursery again, lol. So, I decided I'd post another "tip." This is one of the ways that I save myself some money.

It's pretty simple. Some people know they can do this, but you would be surprised how many people don't.

Instead of purchasing individual packages of pork chops, buy a big unseasoned pork loin. Doing this will save you normally, anywhere from 50-75 cents per pound. Every penny counts! I LOVE doing it this way, because not only do I save my family money, but I can choose how thick and thin I want the chops. And I don't have to worry about bones, either. Pork loins at the grocery store I purchase from are generally 11-12 lb loins. I cut them into 32 chops, and then put them into four labeled freezer storage bags. 

Evan loves pork chops. It's one of the few things I don't really have to coax him to eat. I did make a great meal tonight, and he gobbled it up. I didn't take any pictures, because honestly, I was being lazy. And I have a sore throat. For some reason, that pretty much renders me from doing anything. Me, and more poor poor throat. Who wants to throw me a pity party? If you do, make the cupcakes from my last post. ;)

I'm gonna post the "recipe" for the chops I made. They were good and really easy. It was basically a cheaped up version of apple onion pork chops. I didn't have apples, because I never buy them since I can't eat them, but I always have apple juice on hand. So I used that! Recipe below: (This is for MY family portion. If you are not cooking for leftovers, you could half it if you want to.)

Onion Apple Juice Chops:

8 pork chops, 1/2" thick
2 medium onions, chopped
1 cup apple juice
1 tablespoon brown sugar
garlic and onion powder
Salt and pepper
Oil for frying

Pre-heat oven to 400 degrees. Heat oil in frying pan on medium heat. Salt and pepper both sides of chops. Brown chops on both sides and transfer to a baking dish. Using same oil, sautee onions until tender. Add apple juice, brown sugar, and garlic and onion powder (to your liking.) Bring to boiling, turn heat down and simmer for 5 minutes or so, to cook down the liquid a little. Pour mixture over chop. Bake for 30-40 minutes, or until chops are no longer pink in the middle and juices run clear. (Or use a thermometer. They should reach 160 degree.)

If you try it, let me know. I would love to know if you liked it.


Monday, January 23, 2012

Zebra cupcakes

Ok, before I start this post, I should tell you, I am not a baker. I don't mean that I don't like to bake, just that I'm not very good at it. I'm great at eating it, though. I'm pretty much a MASTER of that. ;) Now that you know that... on with my post.

I've seen through the years, people posting about zebra cakes. It's basically where you mix a chocolate cake and a white cake together, and bake it, and when you open it up, it looks like zebra stripes. Awesome. Who doesn't like to get a little wild? I reallllly have been wanting to try it, but I didn't know where to start. I had read some articles awhile ago (sorry, don't remember the links), and last night, I decided, what the heck; let's try it. 
Now, I didn't have anything I needed. I didn't have a white cake mix or a chocolate cake mix, and I really wasn't in the mood to bake a cake from scratch. (Though, they are always better that way.) I did though, have a yellow cake mix from Pillsbury, and... food coloring. The cake mix I have really isn't the best to use for the technique I tried. Why? Because it has pudding added to it. Sure, it makes cake more moist, but it also makes the batter thicker. It worked, though. So if you want to try this, don't be discouraged if that's all you've got. If you want to try this, but have to go shopping first, choose a mix that doesn't have the pudding in it, simple. 

Also, this technique is really best used in a whole cake, rather than cupcakes... but I didn't feel like flouring a pan, digging out my cake holder, and decorating a cake, so I chose the easy route of cupcakes... with liners. It still worked, it's just not as pronounced as it could have been.

First, start out by gathering all the ingredients you need, according to the cake package. If you want to make the batter from scratch, just google it. I'm sure you'll find a recipe that will work great for you.
If you're only using one mix, divide the mix in half. If you're using a chocolate and a white, you'll already have them separated. 

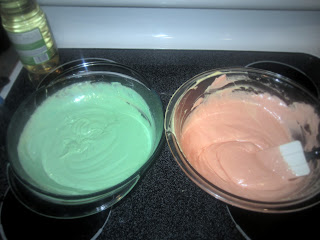
Since I'm only using one mix, I need to add food coloring to each one. The colors I have are red, blue, green and yellow. Since the cake mix is yellow, the only ones that would really work are red and blue, to make the mix green and orange. Green would just make a yucky brown, and yellow would probably just make a brighter yellow.


 Mix, mix, mix... As my son would say "ooooo pretty."

 Once you have your colors made up, you layer the colors. Since I did cupcakes, I used a tablespoon, and did green, orange, green, orange. Get it? If I were making a cake, I would probably use a 1/4 cup instead. (My gears are moving (which is rare), and I think this would look really awesome in a cake with 4 colors.) Fill cupcake liners to about 2/3 full. Bake like the box (or your recipe) tells you to.


While the cupcakes baked, I made up a chocolate buttercream frosting. It was really good, but I wish it were a little thicker. Maybe if I try again, I will add a little more cocoa and sugar to it, or leave out a little of the milk. I found that recipe here.

 After the cupcakes cooled, I frosted them. I don't have a piping bag, so I used a gallon ziploc bag that I filled with the frosting and cut the tip off of. I'll admit, it was the first time I'd ever done it that way, and I have carpal tunnel, so... have I mentioned, I am not a baker?


I was so excited to see how these turned out, I could hardly wait. Neither could my toddler. So I sliced one open...

 I am really happy with the way they turned out. Especially for my first try. I'm really excited now to try this in a cake. 

I hope you enjoyed this post, and if you decide to try it, I hope you'll make my day and share your pictures with me!! 


Sunday, January 22, 2012

Who wants a money saving tip?

Ready for my first money saving tip? Thought so.

 Say you're a family like mine. Dinner doesn't just include the meal, but also the needed leftovers for a packed lunch the next day; for 2 people. This means I'm normally making double the amount of food. I am not a "meal planner." The idea is good, and I've tried many times over. It's just not for me. I do plan on trying again, though. Maybe one day I won't get lazy for meal planning and actually stick to it. Today, is not that day. Even if you're not a family like mine, this tip could still help you save money. So, read on.

Scenario:  Making dinner tonight, I decided to make tacos. I love tacos. When I was gathering the ingredients for the tacos, I discovered I only had 1lb. of ground beef, and since I need to make 2 taco kits, I need 2lbs.  What's a girl to do? My answer is: beans. Yep, beans. You know, beans, beans, they're good for the heart; the more you eat, the more you fart. Sorry, had to do it. Anyhoo, beans are a great substitute for meat. I always seem to have a few cans of beans laying around that I don't know what to do with. My bean of choice is the garbanzo bean, a.k.a. chick peas. I loooove them. I can eat them straight from the can. They are REALLY good for you, too. You could probably use other beans, but in my opinion, the g bean is for me. They have a great texture, so they hold up really well, and don't get mushy cooking in liquid.

So, if you find yourself short on a lb of ground beef (or turkey, which is another great substitute), simply pop open a can of beans, drain and rinse and put into a food processor* or blender and chop them up a bit. Cook your meat and drain, and then add the garbanzo beans. Add your water and seasoning and cook like the directions tell you to. Wa la. Trust me, you won't even know the difference. You can even do this in burgers. I have made many 'o beef and bean burgers. Yummy.

*If you don't own a food processor, I really suggest you get one. I love mine. Don't worry, you don't have to spend a ton of money to enjoy a food processor. I got a cheapy one at Wal Mart for like $5 and I've been using it for years. May not be as good as an expensive one, but it does the job for me. :)*


Saturday, January 21, 2012

Welcome!

Helloooooooo. Welcome to my blog. Yep, I finally jumped on that wagon. Who knows how many followers I will end up with, if any, but I'm gonna enjoy myself, anyhow.

So, what's this blog about, you ask? Well, I guess it's pretty simple; my life. I am a mother of two little boys, and a wife to another. Shhh. Don't tell him I said that. ;) Part of being the Mommy and wife to my family, is finding ways to save our family money. I am a frugal Mama, and I wear that label proudly! If there's a way to save money, I'm looking for it. I love to cook for my family. I am not a gourmet chef, but I still think I'm pretty darn good.  Filling the bellies of my family with good food, makes me happy!

I wanted to start my first post with a recipe that I have wanted to try for awhile. It was a peanut butter chocolate chip cookie bar. It looked sooo good, and I had all the ingredients, so I set out making it tonight. Took out my camera, took some pictures. Was feeling good about my post already. I was picturing exactly what I was going to do, in my head. The batter however, even though followed to a 'T', did not turn out the way it should. I kept adding more flour like she suggested, but the batter would not get to a cookie dough consistancy. I finally gave up and tried to bake it anyway. An hour later, the edges were burning, and the middle was still jiggling. Fail. I'm not off to a good start! I did, however, eat some raw cookie dough batter, (yes, I knoooow, you're not supposed to) so at least it wasn't a total loss. I hate wasting ingredients, though. Hate it. Scratch that recipe off my list.

Don't fear, though! I have LOTS of stuff I've been meaning to try, and this blog is going to give me the motivation to do it. We are gonna have lots of fun together, so make sure you buckle up and Holdren on (clever, huh? Thanks, Heather) for the ride.

Disclaimer: In case you didn't notice ^^ I don't have to best punctuation, nor am I a great novelist. I am though, a down to earth Mama, who is gonna (hopefully) show you some great thinks to cook, bake, craft, and show you ways to save yourself some bucks! I hope you will join me on my new adventure.